Bootstrap Checkbox Switch
Intro
In some instances the most basic aspects might probably get pretty critical-- most especially each time you get to need them. For example just how do your visitors communicate with the webpages you generate claiming a basic Boolean act-- simply yes or no regarding a number of the issues you need to ask, just how they do consent to the conditions or perhaps line up a handful of the possible choices they might have. We in most cases get past this with no paying a lot of an attention to the element chargeable for these kinds of activities yet the Bootstrap Checkbox State is really a very significant component-- one our forms cannot in fact complete without.
Inside the current fourth edition of the Bootstrap platform we are provided with the
.form-check.form-check-label<div>.form-check.form-check-label<label><input>.form-check-inputThe ways to use the Bootstrap checkbox:
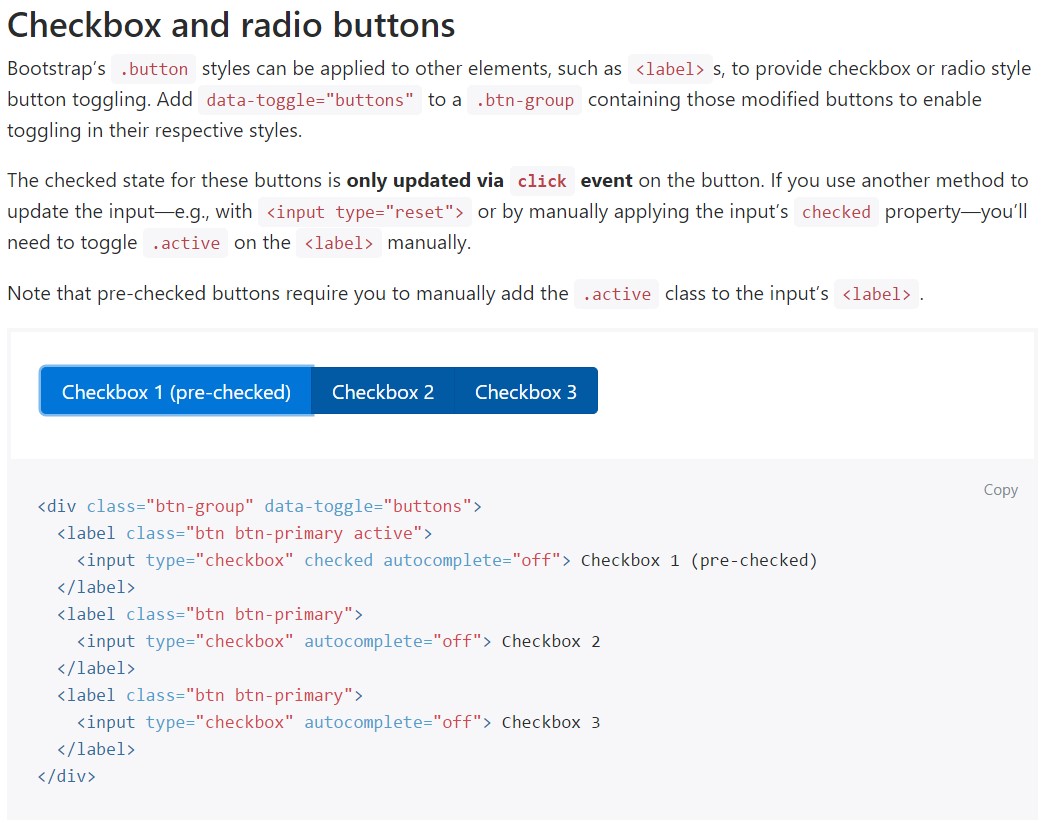
The reviewed state for all of these buttons is only updated through click event on the button. If you work with an additional procedure to upgrade the input-- e.g., with
<input type="reset">.active<label>
<div class="btn-group" data-toggle="buttons">
  <label class="btn btn-primary active">
    <input type="checkbox" checked autocomplete="off"> Checkbox 1 (pre-checked)
  </label>
  <label class="btn btn-primary">
    <input type="checkbox" autocomplete="off"> Checkbox 2
  </label>
  <label class="btn btn-primary">
    <input type="checkbox" autocomplete="off"> Checkbox 3
  </label>
</div>
Once in a while we really need the checkboxes to take place within our forms without the customer actually can bring any activity selecting them-- that is simply where the disabled option appears.
Just to disable correctly a checkbox in Bootstrap 4 working with the typical HTML attribute
disabledIn case that you appreciate the suggestion and actually want to work on this you have to designate the
.disabled.form-checkOne more example
Anytime applying checkboxes, wrap all of them in a
<label>.custom-control.custom-checkboxOperate
.custom-control-input<input>As well employ two
<span>.custom-control-indicator.custom-control-description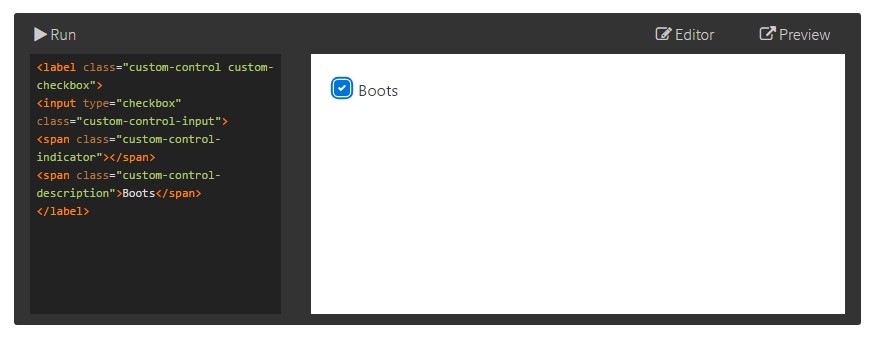
<label class="custom-control custom-checkbox">
<input type="checkbox" class="custom-control-input">
<span class="custom-control-indicator"></span>
<span class="custom-control-description">Boots</span>
</label>
Bootstrap Checkbox Position forms
Default checkboxes and radios are upgraded upon with the aid of
.form-checkDisabled checkboxes and radios are assisted, but to provide a
not-allowed<label>.disabled.form-checkA brand-new aspect for the Bootstrap edition 4 system is the arrival of the so called custom form features. These are the similar features we are knowing within performance but designated even more appealing and also in the Bootstrap means. Utilizing them you may incorporate fascinating spice as well as individuality to your content by just assigning a couple of supplemental classes to the commands you feature in your forms.
If you want to operate custom checkboxes wrap them in a
<label>.custom-control.custom-checkbox<input>.custom-control-input<span>.custom-control-indicator.custom-control-descriptionFinal thoughts
That's basically all that you need to execute in order to include a checkbox component inside your Bootstrap 4 powered website and add in certain custom made flavor to it bring in it a beautiful looks. And now everything you have to do is repeat the practice until you have actually reviewed every one of the checkboxes wanted are already on the webpage.
Check out several online video information about Bootstrap checkbox
Connected topics:
Bootstrap checkbox authoritative records
Centering checkbox buttons in Bootstrap 4 row
Make checkbox always visible in Bootstrap 4
